If you looking for gizmo dorks pei sheet then you are right place. We are searching for the best gizmo dorks pei sheet on the market and analyze these products to provide you the best choice.
Best gizmo dorks pei sheet
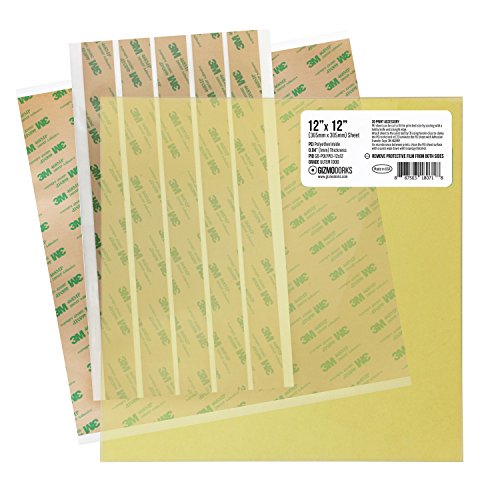


1. Gizmo Dorks PEI Sheet 12" x 12" (305mm x 305mm) 1mm Thick 3D Printer Build Surface with 3M 468MP Adhesive, Made in The USA
Feature
MADE IN THE USA: Single 1mm thick sheet installs quickly on top of existing flat build platforms (e.g. borosilicate glass) using the 3M 468MP adhesive transfer tape.ABS and PLA filaments (along with many other materials) print directly on to PEI surface without the need for additional adhesives, tapes, or slurry.
REMOVE FILM FROM BOTH SIDES BEFORE USING: Blue protective film guards against scratches during shipping and handling.
Reuse for multiple prints, just wipe down with isopropyl alcohol between prints for best results
Includes: 1x PEI sheet, 1x full size 3M 468MP adhesive transfer tape, 5x 1" strips of 3M 468MP adhesive transfer tape
Description
PEI (Polyetherimide) sheets provide a 3D printing build surface that requires no tape, slurry, or adhesive. ABS and PLA both stick extremely well to the surface, which eliminates the need for support rafts used for better adhesion. The printed 3D parts will adhere to the PEI surface on a heated bed, and it will release or pop off when cooling down.How to Use:
Cut the PEI sheet to size by scoring with a hobby knife. Remove the blue protective film from the PEI sheet. Carefully apply the 3M 468MP Transfer Tape and use it to stick the PEI to the print bed. Both a sheet and strips of adhesive are included in each package.Once the PEI sheet is attached, re-level your print bed and you are ready to go!
It helps to wipe the surface down with isopropyl alcohol, methyl alcohol, or soap in between prints. This will ensure the PEI is clean, and help adhesion. Light sanding with 2400 grit paper will also give the PEI sheet more life.2. Gizmo Dorks PEI Sheet 10" x 10" (254mm x 254mm) 1mm Thick 3D Printer Build Surface with 3M 468MP Adhesive, Made in The USA
Feature
MADE IN THE USA: Single 1mm thick sheet installs quickly on top of existing flat build platforms (e.g. borosilicate glass) using the 3M 468MP adhesive transfer tape.ABS and PLA filaments (along with many other materials) print directly on to PEI surface without the need for additional adhesives, tapes, or slurry.
REMOVE FILM FROM BOTH SIDES BEFORE USING: Blue protective film guards against scratches during shipping and handling.
Reuse for multiple prints, just wipe down with isopropyl alcohol between prints for best results
Includes: 1x PEI sheet, 1x full size 3M 468MP adhesive transfer tape, 5x 1" strips of 3M 468MP adhesive transfer tape
Description
PEI (Polyetherimide) sheets provide a 3D printing build surface that requires no tape, slurry, or adhesive. ABS and PLA both stick extremely well to the surface, which eliminates the need for support rafts used for better adhesion. The printed 3D parts will adhere to the PEI surface on a heated bed, and it will release or pop off when cooling down.How to Use:
Cut the PEI sheet to size by scoring with a hobby knife. Remove the blue protective film from the PEI sheet. Carefully apply the 3M 468MP Transfer Tape and use it to stick the PEI to the print bed. Both a sheet and strips of adhesive are included in each package.Once the PEI sheet is attached, re-level your print bed and you are ready to go!
It helps to wipe the surface down with isopropyl alcohol, methyl alcohol, or soap in between prints. This will ensure the PEI is clean, and help adhesion. Light sanding with 2400 grit paper will also give the PEI sheet more life.3. Gizmo Dorks PEI Sheet 8" x 8" (203mm x 203mm) 1mm Thick 3D Printer Build Surface with 3M 468MP Adhesive, Made in The USA
Feature
MADE IN THE USA: Single 1mm thick sheet installs quickly on top of existing flat build platforms (e.g. borosilicate glass) using the 3M 468MP adhesive transfer tape.ABS and PLA filaments (along with many other materials) print directly on to PEI surface without the need for additional adhesives, tapes, or slurry.
REMOVE FILM FROM BOTH SIDES BEFORE USING: Blue protective film guards against scratches during shipping and handling.
Reuse for multiple prints, just wipe down with isopropyl alcohol between prints for best results
Includes: 1x PEI sheet, 1x full size 3M 468MP adhesive transfer tape, 5x 1" strips of 3M 468MP adhesive transfer tape
Description
PEI (Polyetherimide) sheets provide a 3D printing build surface that requires no tape, slurry, or adhesive. ABS and PLA both stick extremely well to the surface, which eliminates the need for support rafts used for better adhesion. The printed 3D parts will adhere to the PEI surface on a heated bed, and it will release or pop off when cooling down.How to Use:
Cut the PEI sheet to size by scoring with a hobby knife. Remove the blue protective film from the PEI sheet. Carefully apply the 3M 468MP Transfer Tape and use it to stick the PEI to the print bed. Both a sheet and strips of adhesive are included in each package.Once the PEI sheet is attached, re-level your print bed and you are ready to go!
It helps to wipe the surface down with isopropyl alcohol, methyl alcohol, or soap in between prints. This will ensure the PEI is clean, and help adhesion. Light sanding with 2400 grit paper will also give the PEI sheet more life.4. Gizmo Dorks PEI Sheet Round 12" (305mm) Diameter 1mm Thick 3D Printer Build Surface with 3M 468MP Adhesive, Made in The USA
Feature
MADE IN THE USA: Single 1mm thick sheet installs quickly on top of existing flat build platforms (e.g. borosilicate glass) using the 3M 468MP adhesive transfer tape.ABS and PLA filaments (along with many other materials) print directly on to PEI surface without the need for additional adhesives, tapes, or slurry.
REMOVE FILM FROM BOTH SIDES BEFORE USING: Blue protective film guards against scratches during shipping and handling.
Reuse for multiple prints, just wipe down with isopropyl alcohol between prints for best results
Includes: 1x PEI Sheet, 1x 3M 468MP Transfer Tape Sheet
Description
PEI (Polyetherimide) sheets provide a 3D printing build surface that requires no tape, slurry, or adhesive. ABS and PLA both stick extremely well to the surface, which eliminates the need for support rafts used for better adhesion. The printed 3D parts will adhere to the PEI surface on a heated bed, and it will release or pop off when cooling down.How to Use:
Cut the PEI sheet to size by scoring with a hobby knife. Remove the blue protective film from the PEI sheet. Carefully apply the 3M 468MP Transfer Tape and use it to stick the PEI to the print bed.Once the PEI sheet is attached, re-level your print bed and you are ready to go!
It helps to wipe the surface down with isopropyl alcohol, methyl alcohol, or soap in between prints. This will ensure the PEI is clean, and help adhesion. Light sanding with 2400 grit paper will also give the PEI sheet more life.5. Gizmo Dorks PEI Sheet 16" x 16" (406mm x 406mm) 1mm Thick 3D Printer Build Surface with 3M 468MP Adhesive, Made in The USA
Feature
MADE IN THE USA: Single 1mm thick sheet installs quickly on top of existing flat build platforms (e.g. borosilicate glass) using the 3M 468MP adhesive transfer tape.ABS and PLA filaments (along with many other materials) print directly on to PEI surface without the need for additional adhesives, tapes, or slurry.
REMOVE FILM FROM BOTH SIDES BEFORE USING: Blue protective film guards against scratches during shipping and handling.
Reuse for multiple prints, just wipe down with isopropyl alcohol between prints for best results
Includes: 1x PEI Sheet, 5x 3M 468MP Adhesive Transfer Tape Sheet (8"x8")
Description
PEI (Polyetherimide) sheets provide a 3D printing build surface that requires no tape, slurry, or adhesive. ABS and PLA both stick extremely well to the surface, which eliminates the need for support rafts used for better adhesion. The printed 3D parts will adhere to the PEI surface on a heated bed, and it will release or pop off when cooling down.How to Use:
Cut the PEI sheet to size by scoring with a hobby knife. Remove the blue protective film from the PEI sheet. Carefully apply the 3M 468MP Transfer Tape and use it to stick the PEI to the print bed. Five 8 inch by 8 inch sheet adhesives are included in each package. Apply the sheets side by side, being careful not to overlap the edges. We've included an extra one just in case.Once the PEI sheet is attached, re-level your print bed and you are ready to go!
It helps to wipe the surface down with isopropyl alcohol, methyl alcohol, or soap in between prints. This will ensure the PEI is clean, and help adhesi6. Gizmo Dorks PEI Sheet 12" x 12" (305mm x 305mm) 1mm Thick 3D Printer Build Surface Ultem 1000, Made in The USA
Feature
MADE IN THE USA: Single 1mm thick sheet installs quickly on top of existing flat build platforms (e.g. borosilicate glass)ABS and PLA filaments (along with many other materials) print directly on to PEI surface without the need for additional adhesives, tapes, or slurry.
REMOVE FILM FROM BOTH SIDES BEFORE USING: Blue protective film guards against scratches during shipping and handling.
Reuse for multiple prints, just wipe down with isopropyl alcohol between prints for best results
Sheet can be easily cut down to desired size by scoring with a utility knife
Description
PEI (Polyetherimide) sheets provide a 3D printing build surface that requires no tape, slurry, or adhesive. ABS and PLA both stick extremely well to the surface, which eliminates the need for support rafts used for better adhesion.How to Use:
Cut the PEI sheet to size by scoring with a hobby knife. There are two methods to attaching the PEI to your print bed. The first method is to just clamp the sheet to the print bed using binder clips. We find that 2 on each side works great.The second method, get 3M 468MP Transfer Tape and use it to stick the PEI to the print bed.Once the PEI sheet is attached, re-level your print bed and you are ready to go!
It helps to wipe the surface down with isopropyl alcohol, methyl alcohol, or soap in between prints. This will ensure the PEI is clean, and help adhesion. Light sanding with 5000 grit paper will also give the PEI sheet more life.7. Gizmo Dorks PEI Sheet 3D Printer Build Surface 220mm x 220mm (8.6" x 8.6") with Laminated 3M 468MP Adhesive, Made in The USA
Feature
Made in the USA - Ultem 1000 PEI sheet installs quickly via the laminated adhesive on top of existing flat build platforms (e.g. borosilicate glass)Bubble free application - The 3M 468MP adhesive is already preapplied to the PEI; simply peel back the tape liner for quick adhesion to the bed
Build Surface - PEI is the perfect no prep build surface which is endlessly reusable for multiple prints; clean with isopropypl alcohol between prints (or with acetone on a COLD bed)
ABS and PLA filaments (along with many other materials) print directly on to PEI surface without the need for additional adhesives, tapes, or slurry
Dimensions: 220 x 220mm / PEI thickness: 0.56mm (0.022 inches) / Laminated 3M 468MP adhesive thickness: 0.13mm (0.005 inches)
Description
Installation
The Polyetherimide sheet comes with 3M 468MP adhesive already laminated to the PEI. Apply the PEI with slight pressure and at an angle to prevent and minimize air bubbles. Once applied set the print bed to 60C and apply pressure evenly across the PEI in a sweeping fashion to firmly set the adhesive. Please use a towel to avoid getting burned. Level the bed and set the height of the nozzle before printing.
If PEI is installed to the top surface of a bed sandwich (a build plate with multiple layers), it is recommended to install PEI on top of borosilicate glass.
Use
Heat the bed to the desired temperatures for printing (60 C for PLA and 100 C for ABS). Depending on how thick your bed sandwich is, your set temperature may not be your surface PEI temperature.
When the print is completed, let the bed cool, and the part will be easy to release from the PEI surface. Parts are actually easier to remove if released before the bed becomes completely cold.
Leveling the bed is very, very important when using PEI. You want the first layer to be close enough to be squished a little. PETG is an exception and doesn't like squished layers, in which case a Z gap should be used.
Maintenance
Clean in between prints with isopropyl alcohol and a lint free rag. Acetone can be used instead of isopropyl alcohol, but the bed must be cold if acetone is used. Optionally, light sanding with 600-1000 grit sand paper can be done after lots of printing to give the PEI sheet more life.
Compatibility
Anet A8 / Anet A6 / Reprap Prusa i3 / And more! PEI can also be cut to size by scoring with a hobby knife.
Dimensions
220mm x 220mm (8.6 x 8.6 inches)
PEI thickness: 0.56mm (0.022 inches)
3M 468MP adhesive thickness: 0.13mm (0.005 inches)
8. Gizmo Dorks PEI Sheet 8" x 8" (203mm x 203mm) 1mm Thick 3D Printer Build Surface Ultem 1000, Made in The USA
Feature
MADE IN THE USA: Single 1mm thick sheet installs quickly on top of existing flat build platforms (e.g. borosilicate glass)ABS and PLA filaments (along with many other materials) print directly on to PEI surface without the need for additional adhesives, tapes, or slurry.
REMOVE FILM FROM BOTH SIDES BEFORE USING: Blue protective film guards against scratches during shipping and handling.
Reuse for multiple prints, just wipe down with isopropyl alcohol between prints for best results
Sheet can be easily cut down to desired size by scoring with a utility knife
Description
PEI (Polyetherimide) sheets provide a 3D printing build surface that requires no tape, slurry, or adhesive. ABS and PLA both stick extremely well to the surface, which eliminates the need for support rafts used for better adhesion.How to Use:
Cut the PEI sheet to size by scoring with a hobby knife. There are two methods to attaching the PEI to your print bed. The first method is to just clamp the sheet to the print bed using binder clips. We find that 2 on each side works great.The second method, get 3M 468MP Transfer Tape and use it to stick the PEI to the print bed.Once the PEI sheet is attached, re-level your print bed and you are ready to go!
It helps to wipe the surface down with isopropyl alcohol, methyl alcohol, or soap in between prints. This will ensure the PEI is clean, and help adhesion. Light sanding with 5000 grit paper will also give the PEI sheet more life.9. Gizmo Dorks PEI Sheet 3D Printer Build Surface 300mm x 300mm (11.8" x 11.8") with Laminated 3M 468MP Adhesive, Made in The USA
Feature
Made in the USA - Ultem 1000 PEI sheet installs quickly via the laminated adhesive on top of existing flat build platforms (e.g. borosilicate glass)Bubble free application - The 3M 468MP adhesive is already preapplied to the PEI; simply peel back the tape liner for quick adhesion to the bed
Build Surface - PEI is the perfect no prep build surface which is endlessly reusable for multiple prints; clean with isopropypl alcohol between prints (or with acetone on a COLD bed)
ABS and PLA filaments (along with many other materials) print directly on to PEI surface without the need for additional adhesives, tapes, or slurry
Dimensions: 300mm x 300mm / PEI thickness: 0.56mm (0.022 inches) / Laminated 3M 468MP adhesive thickness: 0.13mm (0.005 inches)
Description
Installation
The Polyetherimide sheet comes with 3M 468MP adhesive already laminated to the PEI. Apply the PEI with pressure and at an angle to prevent and minimize air bubbles. Once applied set the print bed to 60C and apply pressure evenly across the PEI in a sweeping fashion to firmly set the adhesive. Please use a towel to avoid getting burned. Level the bed and set the height of the nozzle before printing.
If PEI is installed to the top surface of a bed sandwich (a build plate with multiple layers), it is recommended to install PEI on top of borosilicate glass.
Use
Heat the bed to the desired temperatures for printing (60 C for PLA and 100 C for ABS). Depending on how thick your bed sandwich is, your set temperature may not be your surface PEI temperature.
When the print is completed, let the bed cool, and the part will be easy to release from the PEI surface. Parts are actually easier to remove if released before the bed becomes completely cold.
Leveling the bed is very, very important when using PEI. You want the first layer to be close enough to be squished a little. PETG is an exception and doesn't like squished layers, in which case a Z gap should be used.
Maintenance
Clean in between prints with isopropyl alcohol. Acetone can be used instead of isopropyl alcohol, but must be used on a cold bed. Light sanding with 600 grit sand paper can be done after lots of printing to give the PEI sheet more life.
Compatibility
Creality CR-10 / Creality CR-10S / Lulzbot Taz 6 / Lulzbot Taz 5 / Tevo Tornado / Hictop Prusa i3 DIY / And more! PEI can be cut to size by scoring with a hobby knife.
Dimensions
300 x 300mm (11.8 x 11.8 inches)
PEI thickness: 0.56mm (0.022 inches)
3M 468MP adhesive thickness: 0.13mm (0.005 inches)
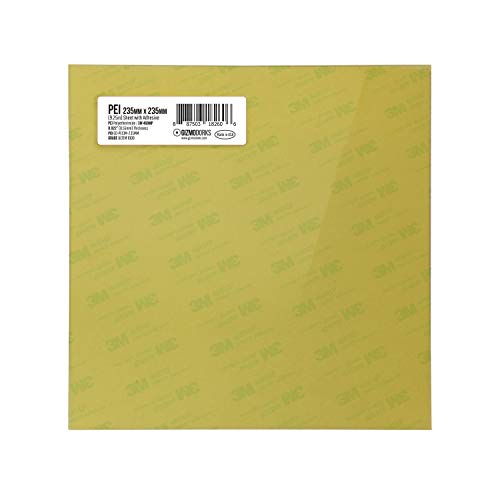
10. Gizmo Dorks PEI Sheet 3D Printer Build Surface 235mm x 235mm (9.3" x 9.3") with Preapplied Laminated 3M 468MP Adhesive for Creality Ender 3 or CR 20 | Made in The USA
Feature
Made in the USA - Ultem 1000 PEI sheet installs quickly via the laminated adhesive on top of existing flat build platforms (e.g. borosilicate glass)Bubble free application - The 3M 468MP adhesive is already preapplied to the PEI; simply peel back the tape liner for quick adhesion to the bed
Build Surface - PEI is the perfect no prep build surface which is endlessly reusable for multiple prints; clean with isopropypl alcohol between prints (or with acetone on a COLD bed)
ABS and PLA filaments (along with many other materials) print directly on to PEI surface without the need for additional adhesives, tapes, or slurry
Dimensions: 235 x 235mm / PEI thickness: 0.56mm (0.022 inches) / Laminated 3M 468MP adhesive thickness: 0.13mm (0.005 inches) / Fits the Creality Ender 3 or Creality CR 20 perfectly!
Description
Installation
The polyetherimide sheet comes with 3M 468MP adhesive already laminated to the PEI. Apply the PEI with slight pressure and at an angle to prevent and minimize air bubbles. Once applied set the print bed to 60C and apply pressure evenly across the PEI in a sweeping fashion to firmly set the adhesive. Please use a towel to avoid getting burned. Level the bed and set the height of the nozzle before printing.
If PEI is installed to the top surface of a bed sandwich (a build plate with multiple layers), it is recommended to install PEI on top of borosilicate glass.
Use
Heat the bed to the desired temperatures for printing (60 C for PLA and 100 C for ABS). Depending on how thick your bed sandwich is, your set temperature may not be your surface PEI temperature.
When the print is completed, let the bed cool, and the part will be easy to release from the PEI surface. Parts are easier to remove if released before the bed becomes completely cold.
Leveling the bed is very, very important when using PEI. You want the first layer to be close enough to be squished a little. PETG is an exception and doesn't like squished layers, in which case a Z gap should be used.
Maintenance
Clean in between prints with isopropyl alcohol. Acetone can be used instead of isopropyl alcohol, but the bed must be cold if acetone is used. Optionally, light sanding with 600-1000 grit sand paper can be done after lots of printing to give the PEI sheet more life.
Compatibility
Creality Ender 3 / Creality CR 20 / and more!
The Creality Ender 3 and the CR 20 have build volumes of 220 x 220mm with a plate size of 235 x 235mm.
Dimensions
235mm x 235mm (9.25 x 9.25 inches)
PEI thickness: 0.56mm (0.022 inches)
3M 468MP adhesive thickness: 0.13mm (0.005 inches)